

So you’ve taken some great photos and you can’t wait to get them on your website. Huge, sharp, colourful, high-def images that really show the customer the quality of your product. You upload your photos; it takes a while but that’s ok these are high quality images after all. It’s done, they’re sorted into folders and you’ve given them good descriptive names, time to get them on your site. You log into your cms and start the upload…
Stop right there! You missed a crucial step.
Have you ever been on a web page that takes ages to load? Of course, you have, who hasn’t? Large white spaces where images should be, slowly popping up one at a time, it’s frustrating, right? It might even (god forbid!!) make you want to click away and shop somewhere else, somewhere, well… faster. We don’t want that to happen with your site so it’s time to learn a little bit about image optimisation.
Before we do though I’m not suggesting that all slow web pages are down to un-optimised images. However, it is one cause of sluggish loading times and will often be the first thing we look for whenever we’re investigating such issues. Read on to learn why we optimise images for the web and how you can be sure that your beautiful photography doesn’t turn your visitors away in frustration!
Firstly, what is image optimisation for the web?
Image optimisation for the web describes the process of reducing the file size of an image in order for a web browser to download it and display it with as little effect on overall page loading time as possible while maintaining the integrity of the image’s quality. In short, it’s about performing a balancing act between displaying a good quality image and reducing an image's file size and keeping your site nippy! So let’s take a look at a few image formats you’ll most likely be dealing with.
Popular image formats on the web today
There are a number of different image formats used on the web today with one of the most popular being the .JPG or JPEG (Joint Photographic Experts Group) - and it’s the one you’re most likely to be using for images of photographic quality.
Other popular types include PNG (Portable Network Graphics), GIF (Graphics Interchange Format), SVG (Scalable Vector Graphic) and TIFF (Tagged Image File Format) among many others. They all have a specific use and are great at serving a particular purpose. Let’s take the .gif for example. Have you ever seen those short, looping videos of cats typing on keyboards? No?! Oh boy, it must be your first day on the internet. Those are gifs and while gifs can be used for static images they can also be used to make short animations of interchanging images; jpegs can’t do this.
But I won’t go into detail about different image formats and their uses because that’s a whole other blog post. If you’d like to know more you might find this informative. Anyway, back to the JPEG and how you can use it.
JPEGS
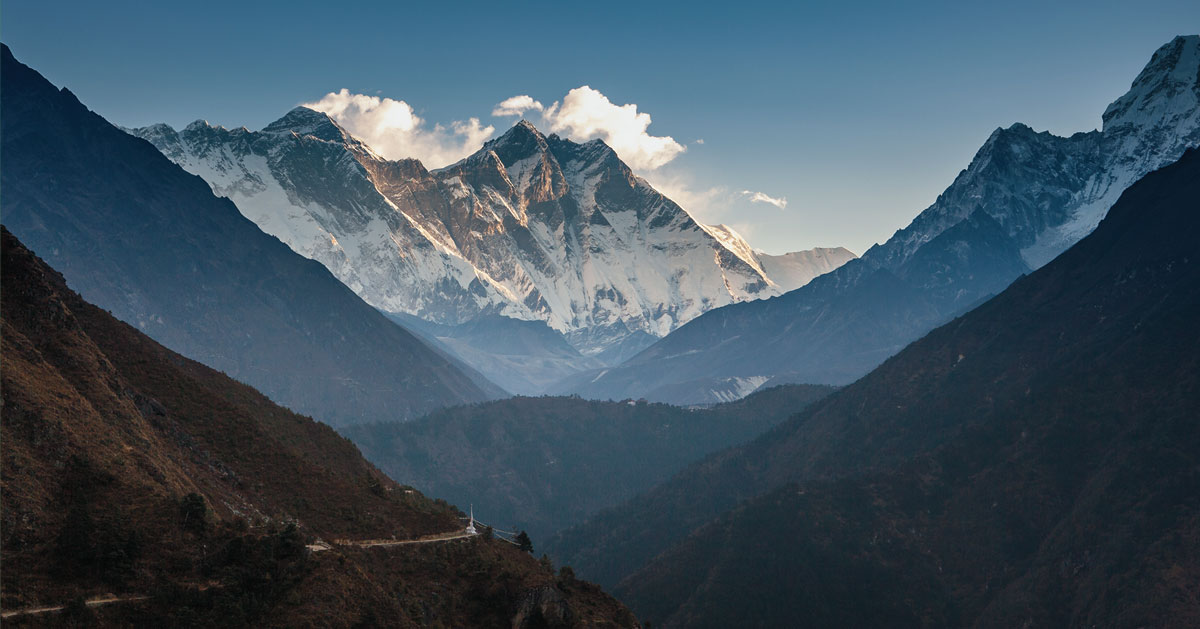
Let’s say you’ve taken a photo on your digital camera you’d like to upload to your site. It’s a lovely, detailed photo of a mountainside with lots of shadow, tone and small detail. This photo will take pride-of-place as your homepage fullscreen background so it needs to be large and sharp. It’s possible that your camera has already saved the image as a JPEG, but if not it will likely have been saved in a similar format.
Straight off the camera, this image will have large file size and a high resolution. We would call this the ‘raw image’. An image in this state is not really suitable for use on a web page since it might have a file size upwards of 7MBs (Megabytes) and dimensions of around 4500px by 3000px (Pixels). Since 7MBs is much larger than the *average web page you can imagine the effect an image with this file size would have on your page's loading time… hint - it will increase it.
(*while an exact figure is impossible to come by, this article places the average web page size at around 3MB in 2017)
Thankfully most CMS (content management system - Umbraco, WordPress etc) media folders will prevent you from uploading anything too large. You might be restricted to file sizes of around 3-4MB, but even an image of that size is still too large for the web. Some CMSs may even compress the image for you, but you’ll probably want more control over how this is done.
But what is it that determines an image's file size? Good question. Basically, it’s the amount of data the image file contains such as dimension (width x height), DPI (dots per inch) and colour information (number of colours used). The higher the resolution - the more information the image has - the bigger the file size. So in order to compress our image we need to reduce the amount of data it carries.
Compressing a JPEG image file
Compressing a JPEG mainly consists of reducing its dimensions and display information to a suitably low level while ensuring your image is still crisp and colourful. So if our image is 7MB in its raw format, we’d want to get the file size down to something much more acceptable like 150KB - 200KB (*0.15MB - 0.20MB), which is a huge reduction! There are no hard and fast rules as to how big your fullscreen background image file size should be but anything less than 200KB would be a good aim.
*1 Megabyte = 1000 Kilobytes
The first thing to do would be to reduce the dimensions of the image. At the moment our image has dimensions of 4500px x 3000px, but we don’t need it to be this big as most screen sizes are no larger than 1920px wide, which means we can more than half the width of our image and be confident that it will cover most screen sizes without having to stretch itself to fit (and by doing so reducing its quality). We can use a program such as Adobe Photoshop or its free, slightly goofier little brother GIMP graphics editor to do this, but you may have your own preference already.
Now that your image is in the correct dimension we can apply the JPEG compression method. A JPEG image is compressed by reducing the amount of information contained within it. One way this occurs is by the reduction of the amount of colour information the image is using. To explain a raw image of a blue sky might have a few thousand very subtle shades of blue running through it, compressing the image might reduce this down to a few hundred shades, ridding the image of some of its finer details but also getting rid of a mountain of data (which is our aim)! It is because of this loss of data that JPEG compression is known as lossy compression.
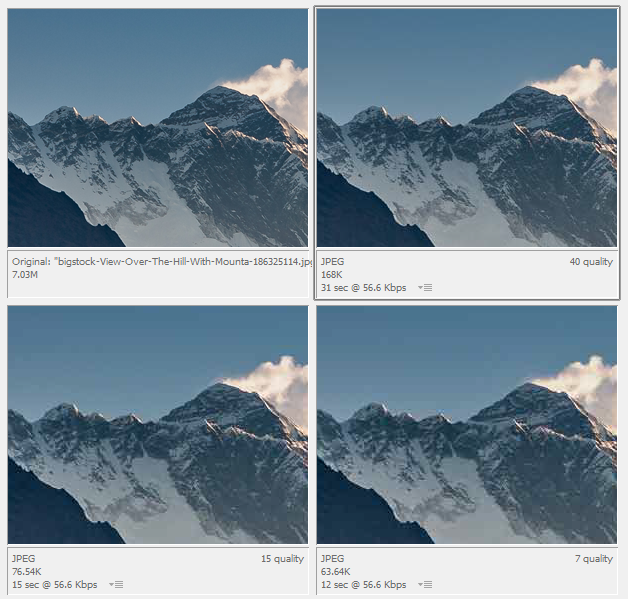
This kind of compression can have some unwanted effects known as ‘artefacts’ such as banding and pixelation. Take the below comparison as an example of how increasing amounts of compression can affect an image's quality. The image in the top left is our uncompressed image while the image in the bottom right has a high level of compression applied. Note the banding of the colours in the sky and blurry mountain detail. Also, note the file sizes - 7.03MB vs 63.64KB. It’s finding a balance between file size and quality that requires the human touch. In this scenario, I’d be happy with the image in the top right, 168KBs (lower than our 200KB target) in size and still maintaining its sharpness and detail.
To apply our compression in Photoshop or GIMP, we use the ‘Save For Web & Devices’ option - here’s a quick guide on how to do this. There are also online compression tools if you don’t fancy downloading one of the above applications. This one looks pretty good.
So what do we do now? Well, we’ve reduced its dimensions from 5000px to 1920px wide (height remained relative but if you need to crop, crop away) and taken the file size from 7MB to 168KB. We kept the quality intact and the colours vibrant. Time to get it on your site and let your users enjoy it!
Seems like a lot of hassle all this, why should I bother?
A number of reasons mainly due to the impact large images have on your sites loading time but there are other reasons:
Google will penalise slow, data-hungry websites giving them a lower priority in search results. I think you’ll agree that this is bad all around.
Large images take up a lot of server space which costs money. Save yourself a bob or two and optimise.
Nobody likes using slow websites. Keep your loading time snappy and your clients happy!
The bigger a webpage is the more data is used to download it. This can be costly for users with a restricted mobile data allowance.
Tips and tricks
A few things worth noting when it comes to image optimisation.
Stock photo sites: If you’re fond of grabbing those lovely big stock images from sites such as Big Stock or Pexels be aware that they are unlikely to be optimised already. You should treat these images like they’ve just come off your camera.
Retina Displays - An Apple term but other companies are producing displays of the same nature. Retina Displays are double density displays which are capable of displaying high definition images. Such screens can cause greater exposure of the compression artefacts of images which have been optimised to a high degree. So be careful not to overdo it.
Every image is different: Depending on the complexity of your images the level of compression you can apply will differ. Images with large blocks of the same colour are likely to be able to take more compression than images that contain a lot of colour and detail.
WP Smush: If you're using WordPress, this is a great plugin for automatically optimising your large images on upload.
In Conclusion
While this is by no means an exhaustive or definitive article on image optimisation, it should give you a good understanding of why we do it and how you can do it with minimal time and effort. There’s a whole lot of information out there and if you want to know more just drop this into google ‘image optimisation for the web’ and dive right in!
The way I see it, image optimisation is about respecting your website and your users. It’s a form of maintenance, keeping things neat and tidy. Not only will the people using your site appreciate the slick and speedy experience they’d also be much more likely to return again and again. Not only that, but the big guys over at Google will also appreciate it. As I mentioned earlier, quick loading, mobile-friendly sites are favoured in search rankings.
You may already know a lot about this subject and disagree with some of the things I’ve said, if so please get in touch, @wearegecko because we’d love to hear from you and be put right. In addition, if you have any questions, if there’s something I’ve missed or there’s something you’d like to know more about then please drop us a line.
Thanks for reading my article, next time I’ll be looking at a web administrator's worst nightmare… breaking the internet!
- Dave


